
 For class last night, we tried our hand at making 3D molds. Chef first demonstrated how to trim the plastic molds so that we could affix binder clips to hold it in place. For molds like a Santa Claus or snowman figurine, he cut out a small hole in the bottom. The procedure was to brush tempered chocolate into the mold so that any fine details were covered. Then, he quickly poured chocolate into the mold and let it empty. This formed the outer shell. After putting the two halves of the mold together, he clipped them together so it would hold tightly. Then, through the hole on the bottom, he poured in chocolate and emptied it again. Each pouring creates another layer that thickens the outer shell of the mold.
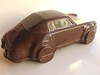
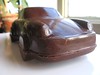 My mold was in the shape of a Porsche, with one half for the base and wheels, and the other for the body. Chef thought it would be best if I molded the two halves separately, rather than clipping them together and filling it as for a figurine. I made a solid piece from the relative shallow bottom-half, then used successive pourings of chocolate to build up the top half. To achieve an even thickness, I used a brush to paint the thinner parts. When the two halves were set (helped by the refrigerator), I crossed my fingers and unmolded them. Fortunately, they came out in one piece, with a nice shiny surface. A bit of melted chocolate on the base helped to glue the two together.
Last week, we made up some chocolate modelling paste with melted chocolate and corn syrup. We used it this week to practise making flowers (roses, carnations, Calla lilies). The petals were made by flattening small balls of modelling paste, then affixing them to a base. Feh, I wasn't very interested in this work, as they're purely decorative items that would probably taste awful.
Leave a comment