
 Chef demonstrated the procedure of making shiny molded chocolates. First, he advised us to never clean our molds with soap and water as it could leave residual spots if not dried thoroughly. Rather, he said we could wipe the molds out and then use a hair dryer to warm any cocoa butter and polish the cavities with cotton balls. With cleaning instructions out of the way, he showed us how to ladle melted chocolate over the surface of the mold, then invert it to let the excess fall back into the bowl. The thin streams of dripping chocolate was one of the neatest things I've ever seen. Our instructor cautioned us to be careful not to hold the mold from underneath lest we untemper the chocolate. The final step is to tap the molds on the table so that any trapped bubbles would surface. One interesting technique Chef showed us is how to achieve an even smoother finish by quickly swiping the interior of the empty mold with a finger dipped in tempered chocolate. Afterwards, they're filled as I described above.
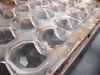
Once the shells had hardened, he piped in the caramel mixture. Viewed horizontally, the filling should not rise above the mold so that there would be room to seal the chocolates. Once the caramel was firm and no longer stuck to a finger, Chef ladled more tempered chocolate over the mold. With a flat spatula, he carefully levelled the chocolate, at the same time scraping any excess off the mold. This step was important to help ensure the chocolates would be easy to unmold.
 Like some of my classmates, I purchased a polycarbonate mold from www.chocolat-chocolat.com. My shells were a bit thick on the top; I've read that an even thickness can be achieved by rotating the molds as they harden, so that the chocolate does not collect on one side. Piping the filling was a bit problematic as well, as the mixture was thick and the tip of my parchment cone was small. After sealing the chocolates, I placed them briefly into the fridge to set.
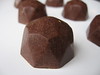 Unmolding was the best part of class: imagine everyone whacking the molds onto the workbench with chocolates randomly falling out! Once in a while, there would be a cry of dismay as a caramel-filled confection would get inadvertently crushed. Properly tempered chocolate contracts as it cools so combined with a perfectly polished mold, it's supposed to be a simple process to extract the filled chocolates. However, those of us with the hard molds spent quite a bit of time banging them in frustration.
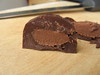
Our tempering wasn't quite perfect so my chocolates came out all speckled. They tasted delicious though, with a smooth creamy consistency in the filling. I really want to experiment with unusual fillings so I'm waiting for a new book, Making Artisan Chocolates to be published.
Leave a comment