
 For the final class of this course, Chef began by showing us how to make a flat sheet by spreading tempered chocolate on top of a piece of plastic. Using an offset spatula, he made a thin layer that he let set until the surface was dull, then cut it while it was still soft. We made stencils out of cardboard to form the base, sides and top of the chocolate box we were making. Once the pieces were completely set, we peeled them off the plastic and assembled the box. To affix the sides to the base, we dipped the edge of a short and long side into cooled tempered chocolate which had started to get thick. We quickly placed the two sides on the base, at right angles to each other; the sides held each other up, helped by the chocolate “glue”. Chef said we could pipe beads or another pattern over the edges to hide the glue, or we could wrap the base with a ribbon. I was lazy and did neither.
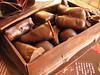 To fill the box, Chef suggested we make solid chocolates out of some shallow molds, or we could dip marzipan pieces into chocolate. The mixture was made using 33% marzipan, mixed glacé fruit and nuts. The percentage refers to the amount of almond paste, the rest made up of sugar and other ingredients. We learned that it's easier to knead the lower percentage marzipan as it oozes less oil but its taste isn't a strong as, say, a 50% or 60% marzipan.
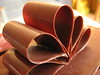 Some people piped lettering or patterns on top of the box using white chocolate, but I had Chef show me how to make a chocolate ribbon. Using a roll of acetate that I had, he showed me how to spread tempered chocolate on a short length, then join the ends and hold them together with a binder clip. He stressed the importance of coating it completely and evenly or else the ribbon might crack. After a short spell in the fridge, I removed the clips and peeled of the acetate. I glued each teardrop shaped piece on to the lid with more chocolate, forming a ribbon one loop at a time. Mine ended up looking like the NBC logo; longer loops laid flatter, along with a notched end, would be more like it. Still, it's pretty impressive.
Finally, Chef showed us how to assemble a swan. He piped an oval base and filled it in with random squiggles. Two sets of wings, small and large, were next; he said it's important to make both left and right ones so that the sides will be symmetrical. The head was a long S-curve with a tiny beak made by flicking the tip of the pastry tube quickly across the head. I didn't make one in class, but will definitely have to try it.
While the instructor was excellent and the course overall was good, I felt the individual classes were sometimes lacking in content. Chocolate Works is 50% more expensive than the other Bakery Arts classes due largely to the additional cost of the 1 kg (or more) of chocolate that we used each week. But the first two classes were very basic, and didn't run for the full timeslot, so I felt a bit short-changed that way. This class at George Brown delivers the best value but they're not the only game in town. The Chocolate Doctor and js bonbons offer chocolate classes as well.
Leave a comment